How to Build a Barcode Scanner App with Flutter Step by Step
Barcode scanner apps can be used across a variety of industries, including retail, manufacturing, logistics, and healthcare. They are used to track inventory, manage assets, and improve the efficiency of business operations. In this article, we will walk through the steps of building a multiple barcode and QR code scanner app with Flutter and Dynamsoft Barcode Reader on Windows, Android, iOS and Web platforms.
This article is Part 2 in a 3-Part Series.
Try Online Demo with Your Mobile Devices

https://yushulx.me/flutter-barcode-scanner/
Needed Flutter Plugins
- flutter_barcode_sdk: Wraps Dynamsoft Barcode Reader SDK for Flutter, supporting Windows, Linux, macOS, Android, iOS and Web. A valid license key is required to use the plugin.
- image_picker: Provides an easy way to pick an image/video from the image library, or to take a picture/video with the camera.
- shared_preferences: Wraps platform-specific persistent storage for simple data (NSUserDefaults on iOS and macOS, SharedPreferences on Android, etc.).
- camera: Provides APIs for identifying cameras, displaying a preview, and capturing images or video from a camera.
- share_plus: Shares content via the platform share UI.
- url_launcher: Launches URLs, making it easy to open a web page.
- flutter_exif_rotation: Rotates images automatically based on the EXIF orientation on Android and iOS.
Getting Started with the App
-
Create a new Flutter project with the command:
flutter create barcodescanner -
Add the dependencies to
pubspec.yaml:dependencies: flutter_barcode_sdk: ^2.2.4 image_picker: ^1.0.0 shared_preferences: ^2.1.1 camera: git: url: https://github.com/yushulx/flutter_camera.git camera_windows: git: url: https://github.com/yushulx/flutter_camera_windows.git share_plus: ^7.0.2 url_launcher: ^6.1.11 flutter_exif_rotation: ^0.5.1Here we use a forked version of the Flutter camera plugin, which relies on a modified camera_web plugin to solve the issue of camera preview flipping on the desktop web platform.
 camera_web:
   git:
     url: https://github.com/yushulx/flutter_camera_web.git
The
camera_windowsplugin is used to support image streaming from the camera on Windows. It is ported from https://github.com/flutter/packages/tree/main/packages/camera/camera_windows. -
Create a
global.dartfile to store global variables:import 'package:flutter_barcode_sdk/flutter_barcode_sdk.dart'; FlutterBarcodeSdk barcodeReader = FlutterBarcodeSdk(); bool isLicenseValid = false; Future<int> initBarcodeSDK() async { int ret = await barcodeReader.setLicense( 'DLS2eyJoYW5kc2hha2VDb2RlIjoiMjAwMDAxLTE2NDk4Mjk3OTI2MzUiLCJvcmdhbml6YXRpb25JRCI6IjIwMDAwMSIsInNlc3Npb25QYXNzd29yZCI6IndTcGR6Vm05WDJrcEQ5YUoifQ=='); if (ret == 0) isLicenseValid = true; await barcodeReader.init(); await barcodeReader.setBarcodeFormats(BarcodeFormat.ALL); return ret; } -
Replace the contents in
lib/main.dartwith the following code:import 'package:flutter/material.dart'; import 'tab_page.dart'; import 'dart:async'; import 'global.dart'; Future<void> main() async { runApp(const MyApp()); } class MyApp extends StatelessWidget { const MyApp({super.key}); Future<int> loadData() async { return await initBarcodeSDK(); } @override Widget build(BuildContext context) { return MaterialApp( title: 'Dynamsoft Barcode Detection', theme: ThemeData( scaffoldBackgroundColor: colorMainTheme, ), home: FutureBuilder<int>( future: loadData(), builder: (BuildContext context, AsyncSnapshot<int> snapshot) { if (!snapshot.hasData) { return const CircularProgressIndicator(); } Future.microtask(() { Navigator.pushReplacement(context, MaterialPageRoute(builder: (context) => const TabPage())); }); return Container(); }, ), ); } }When launching the app, the
FutureBuilderwidget will display a loading indicator until the barcode reader is initialized. After that, theNavigatorwidget will redirect the user to theTabPagewidget.
Building the User Interface
In the subsequent sections, we will adhere to the UI design guidelines to fully develop the barcode scanner application.

Tab Bar
The tab bar is used to navigate between the home page, history page, and about page.

It is implemented with the TabBar, TabController and TabBarView widgets:
class _TabPageState extends State<TabPage> with SingleTickerProviderStateMixin {
  late TabController _tabController;
  final List<CustomTab> myTabs = <CustomTab>[
    CustomTab(
        text: 'Home',
        icon: 'images/icon-home-gray.png',
        selectedIcon: 'images/icon-home-orange.png'),
    CustomTab(
        text: 'Scan History',
        icon: 'images/icon-history-gray.png',
        selectedIcon: 'images/icon-history-orange.png'),
    CustomTab(
        text: 'About',
        icon: 'images/icon-about-gray.png',
        selectedIcon: 'images/icon-about-orange.png'),
  ];

  int selectedIndex = 0;

  @override
  void initState() {
    super.initState();
    _tabController = TabController(vsync: this, length: 3);
  }

  @override
  Widget build(BuildContext context) {
    return Scaffold(
        body: TabBarView(
          controller: _tabController,
          children: const [
            HomePage(),
            HistoryPage(),
            AboutPage(),
          ],
        ),
        bottomNavigationBar: SizedBox(
          height: 83,
          child: TabBar(
            labelColor: Colors.blue,
            controller: _tabController,
            onTap: (index) {
              setState(() {
                selectedIndex = index;
              });
            },
            tabs: myTabs.map((CustomTab tab) {
              return MyTab(
                  tab: tab, isSelected: myTabs.indexOf(tab) == selectedIndex);
            }).toList(),
          ),
        ));
  }
}
The tabs could be customized with the CustomTab class. In our case, when a tab is selected, the icon and text will change color.
class MyTab extends StatelessWidget {
  final CustomTab tab;
  final bool isSelected;

  const MyTab({super.key, required this.tab, required this.isSelected});

  @override
  Widget build(BuildContext context) {
    return Tab(
      child: Column(
        mainAxisAlignment: MainAxisAlignment.center,
        children: <Widget>[
          Image.asset(
            isSelected ? tab.selectedIcon : tab.icon,
            width: 48,
            height: 32,
          ),
          Text(tab.text,
              overflow: TextOverflow.ellipsis,
              style: TextStyle(
                fontSize: 9,
                color: isSelected ? colorOrange : colorSelect,
              ))
        ],
      ),
    );
  }
}

class CustomTab {
  final String text;
  final String icon;
  final String selectedIcon;

  CustomTab(
      {required this.text, required this.icon, required this.selectedIcon});
}
Home Page
The home page contains a title, a description, a pair of buttons, and a banner. The title, description and buttons are centered horizontally. The banner fills the remaining space.

-
The title is aligned with the
Paddingwidget and theTextAlign.centerproperty:var title = const Padding( padding: EdgeInsets.only( top: 32, ), child: Text('BARCODE SCANNER', textAlign: TextAlign.center, style: TextStyle( fontSize: 32, color: Colors.white, )), ); -
The description is aligned with the
Paddingwidget and theEdgeInsets.onlyproperty:var description = Padding( padding: const EdgeInsets.only(top: 7, left: 33, right: 33), child: Text( "Whether it's distorted, dark, distant, blurred, batch or moving, we can scan it. At speed.", style: TextStyle( fontSize: 18, color: colorTitle, ))); -
There are two buttons in the home page. The first button is used to launch the camera scanning page. The second button is used to pick an image file. To customize the buttons with
onTap()event, theGestureDetectorandContainerwidgets are used:final buttons = Padding( padding: const EdgeInsets.only(top: 44), child: Row( mainAxisAlignment: MainAxisAlignment.spaceEvenly, children: [ GestureDetector( onTap: () { if (!kIsWeb && Platform.isLinux) { showAlert(context, "Warning", "${Platform.operatingSystem} is not supported"); return; } Navigator.push(context, MaterialPageRoute(builder: (context) { return const CameraPage(); })); }, child: Container( width: 150, height: 125, decoration: BoxDecoration( color: colorOrange, borderRadius: BorderRadius.circular(10.0), ), child: Column( mainAxisAlignment: MainAxisAlignment.center, children: <Widget>[ Image.asset( "images/icon-camera.png", width: 90, height: 60, ), const Text( "Camera Scan", overflow: TextOverflow.ellipsis, style: TextStyle(fontSize: 16, color: Colors.white), ) ], ), )), GestureDetector( onTap: () { scanImage(); }, child: Container( width: 150, height: 125, decoration: BoxDecoration( color: colorBackground, borderRadius: BorderRadius.circular(10.0), ), child: Column( mainAxisAlignment: MainAxisAlignment.center, children: <Widget>[ Image.asset( "images/icon-image.png", width: 90, height: 60, ), const Text( "Image Scan", overflow: TextOverflow.ellipsis, style: TextStyle(fontSize: 16, color: Colors.white), ) ], ), )) ], )); -
To fill the remaining space, the banner is implemented with the
ExpandedandPositionedwidgets inside aStackwidget. A warning message is displayed on top of the banner if the license is invalid or expired:final image = Image.asset( "images/image-barcode.png", width: MediaQuery.of(context).size.width, fit: BoxFit.cover, ); Expanded( child: Stack( children: [ Positioned.fill( child: image, ), if (!isLicenseValid) Opacity( opacity: 0.8, child: Container( width: MediaQuery.of(context).size.width, height: 40, color: const Color(0xffFF1A1A), padding: const EdgeInsets.only(left: 20, right: 20), child: InkWell( onTap: () { launchUrlString( 'https://www.dynamsoft.com/customer/license/trialLicense?product=dbr&source=codepool'); }, child: const Row( children: [ Icon(Icons.warning_amber_rounded, color: Colors.white, size: 20), Text( " License expired! Renew your license ->", style: TextStyle( fontSize: 14, color: Colors.white, fontWeight: FontWeight.bold), ), ], ))), ) ], ))
Camera Scanning Page
The camera scanning page contains a camera preview, a barcode type setting button, a camera stop button and a camera flip button.

To display the camera preview, we use the CameraPreview widget:
CameraController? controller;

Widget getPreview() {
    if (controller == null || !controller!.value.isInitialized || isFinished) {
      return Container(
        child: const Text('No camera available!'),
      );
    }

    return CameraPreview(controller!);
  }
The flip button is used to switch between the front and back cameras.
Future<void> switchCamera() async {
    if (_cameras.length == 1) return;
    isFinished = true;

    if (kIsWeb) {
      await waitForStop();
    }

    cameraIndex = cameraIndex == 0 ? 1 : 0;
    toggleCamera(cameraIndex);
  }

Future<void> toggleCamera(int index) async {
    ResolutionPreset preset = ResolutionPreset.high;
    controller = CameraController(_cameras[index], preset);
    controller!.initialize().then((_) {
      if (!cbIsMounted()) {
        return;
      }

      previewSize = controller!.value.previewSize;

      startVideo();
    }).catchError((Object e) {
      if (e is CameraException) {
        switch (e.code) {
          case 'CameraAccessDenied':
            break;
          default:
            break;
        }
      }
    });
  }
The setting button is used to open the barcode type setting page.
onPressed: () {
  _cameraManager.pauseCamera();
  Navigator.push(
          context,
          MaterialPageRoute(
              builder: (context) => const SettingPage()))
      .then((value) {
    _cameraManager.resumeCamera();
  });
},
As the stop button is pressed, it will stop the camera stream and then navigate to the result page. The pushReplacement method is used to replace the current camera page with the result page:
Navigator.pushReplacement(
        context,
        MaterialPageRoute(
          builder: (context) => ResultPage(barcodeResults: order),
        ));
Barcode Type Setting Page
The barcode type setting page contains a list of barcode types that can be expanded or collapsed.
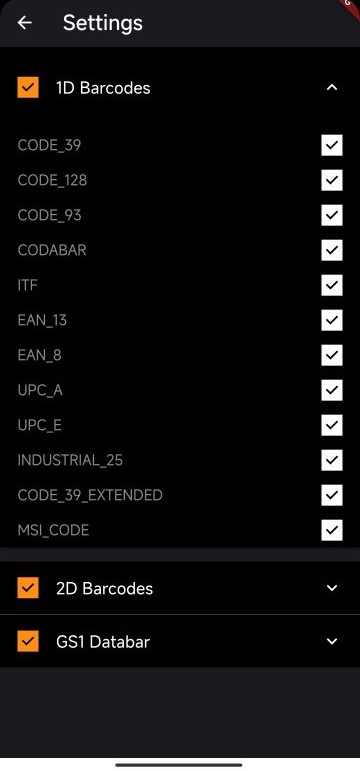
The ExpansionPanelList and ExpansionPanel widgets are used to implement the expansion and collapse effect:
class _ExpansionPanelListFormatsState extends State<ExpansionPanelListFormats> {
  @override
  Widget build(BuildContext context) {
    return SingleChildScrollView(
      child: Container(
        child: _buildPanel(),
      ),
    );
  }

  Widget _buildPanel() {
    return ExpansionPanelList(
      expandIconColor: Colors.white,
      dividerColor: Colors.grey[800],
      expansionCallback: (int index, bool isExpanded) {
        setState(() {
          allFormats[index].isExpanded = !isExpanded;
        });
      },
      children: allFormats.map<ExpansionPanel>((Item item) {
        return ExpansionPanel(
          backgroundColor: Colors.black,
          headerBuilder: (BuildContext context, bool isExpanded) {
            return SizedBox(
                height: 60,
                child: Container(
                  padding: const EdgeInsets.only(left: 20, right: 20),
                  child: Row(
                    children: [
                      Container(
                        width: 24,
                        height: 24,
                        color: colorOrange,
                        child: Checkbox(
                          fillColor: MaterialStateColor.resolveWith(
                              (states) => colorOrange),
                          checkColor: Colors.black,
                          activeColor: Colors.white,
                          value: item.isAllSelected,
                          onChanged: (bool? value) {
                            setState(() {
                              item.isAllSelected = value!;
                              if (item.isAllSelected) {
                                item.selectedOptions.clear();
                                item.selectedOptions.addAll(item.expandedValue);
                              } else {
                                item.selectedOptions.clear();
                              }
                            });
                            updateFormats();
                          },
                        ),
                      ),
                      const SizedBox(width: 20),
                      Text(
                        item.headerValue,
                        style:
                            const TextStyle(color: Colors.white, fontSize: 16),
                      )
                    ],
                  ),
                ));
          },
          body: ListView(
            children: item.expandedValue.map<Widget>((String value) {
              return SizedBox(
                  height: 40,
                  child: Container(
                      padding: const EdgeInsets.only(left: 20, right: 20),
                      child: Row(
                        children: [
                          Text(
                            value,
                            style: TextStyle(color: colorText, fontSize: 14),
                          ),
                          Expanded(child: Container()),
                          Container(
                            width: 24,
                            height: 24,
                            color: Colors.white,
                            child: Checkbox(
                              fillColor: MaterialStateColor.resolveWith(
                                  (states) => Colors.white),
                              checkColor: item.selectedOptions.contains(value)
                                  ? Colors.black
                                  : null,
                              activeColor: Colors.white,
                              value: item.selectedOptions.contains(value),
                              onChanged: (bool? changedValue) {
                                setState(() {
                                  item.selectedOptions.contains(value)
                                      ? item.selectedOptions.remove(value)
                                      : item.selectedOptions.add(value);
                                });
                                updateFormats();
                              },
                            ),
                          ),
                        ],
                      )));
            }).toList(),
          ),
          isExpanded: item.isExpanded,
        );
      }).toList(),
    );
  }
}
Result Page
The result page displays the barcode detection results. The user can copy the barcode text to the clipboard, share them with other apps, and save them to the local storage.

To display each barcode result with a copy button, the ListView and MyCustomWidget widgets are used:
final resultList = Expanded(
        child: ListView.builder(
            itemCount: widget.barcodeResults.length,
            itemBuilder: (context, index) {
              return MyCustomWidget(
                index: index,
                result: widget.barcodeResults[index],
              );
            }));

class MyCustomWidget extends StatelessWidget {
  final BarcodeResult result;
  final int index;

  const MyCustomWidget({
    super.key,
    required this.index,
    required this.result,
  });

  @override
  Widget build(BuildContext context) {
    return DecoratedBox(
        decoration: const BoxDecoration(color: Colors.black),
        child: Padding(
            padding:
                const EdgeInsets.only(top: 13, bottom: 14, left: 20, right: 19),
            child: Row(
              children: [
                Text(
                  '${index + 1}',
                  style: TextStyle(color: colorGreen, fontSize: 14),
                ),
                const SizedBox(width: 14),
                Column(
                  crossAxisAlignment: CrossAxisAlignment.start,
                  children: [
                    Text(
                      'Format: ${result.format}',
                      style: const TextStyle(
                          color: Colors.white,
                          fontSize: 14,
                          overflow: TextOverflow.ellipsis),
                    ),
                    SizedBox(
                      width: MediaQuery.of(context).size.width - 110,
                      child: Text(
                        'Text: ${result.text}',
                        style: const TextStyle(
                            color: Colors.white,
                            fontSize: 14,
                            overflow: TextOverflow.ellipsis),
                      ),
                    ),
                  ],
                ),
                Expanded(child: Container()),
                InkWell(
                  onTap: () {
                    Clipboard.setData(ClipboardData(
                        text:
                            'Format: ${result.format}, Text: ${result.text}'));
                  },
                  child: Text('Copy',
                      style: TextStyle(color: colorGreen, fontSize: 14)),
                ),
              ],
            )));
  }
}
We use the SharedPreferences plugin to save the results to the local storage:
onPressed: () async {
  final SharedPreferences prefs =
      await SharedPreferences.getInstance();
  var results = prefs.getStringList('barcode_data');
  List<String> jsonList = <String>[];
  for (BarcodeResult result in widget.barcodeResults) {
    jsonList.add(jsonEncode(result.toJson()));
  }
  if (results == null) {
    prefs.setStringList('barcode_data', jsonList);
  } else {
    results.addAll(jsonList);
    prefs.setStringList('barcode_data', results);
  }
}
The content share feature can be implemented with the Share.share method:
onPressed: () {
  String result = '';
  for (BarcodeResult barcodeResult in widget.barcodeResults) {
    result +=
        'Format: ${barcodeResult.format}, Text: ${barcodeResult.text}\n';
  }
  Share.share(result);
}
History Page
The history page displays the barcode detection results that are saved on the local storage. It contains a delete button that can be used to delete all the results, and a more button that can pop up a context menu to delete or copy a single result.

As the page is initialized, the initState method is called to load the saved results from the local storage:
@override
void initState() {
  super.initState();
  loadHistory();
}

Future<void> loadHistory() async {
  final SharedPreferences prefs = await SharedPreferences.getInstance();
  var data = prefs.getStringList('barcode_data');
  if (data != null) {
    _barcodeHistory.clear();
    for (String json in data) {
      BarcodeResult barcodeResult = BarcodeResult.fromJson(jsonDecode(json));
      _barcodeHistory.add(barcodeResult);
    }
  }
  setState(() {
    _isLoaded = true;
  });
}
The barcode results will then be fed to the ListView widget:
var listView = Expanded(
        child: ListView.builder(
            itemCount: _barcodeHistory.length,
            itemBuilder: (context, index) {
              return MyCustomWidget(
                  result: _barcodeHistory[index],
                  cbDeleted: () async {
                    _barcodeHistory.removeAt(index);
                    final SharedPreferences prefs =
                        await SharedPreferences.getInstance();
                    List<String> data =
                        prefs.getStringList('barcode_data') as List<String>;
                    data.removeAt(index);
                    prefs.setStringList('barcode_data', data);
                    setState(() {});
                  },
                  cbOpenResultPage: () {});
            }));
The MyCustomWidget widget is used to display a single barcode result and provide the delete and copy functions:
class MyCustomWidget extends StatelessWidget {
  final BarcodeResult result;
  final Function cbDeleted;
  final Function cbOpenResultPage;

  const MyCustomWidget({
    super.key,
    required this.result,
    required this.cbDeleted,
    required this.cbOpenResultPage,
  });

  @override
  Widget build(BuildContext context) {
    return DecoratedBox(
        decoration: const BoxDecoration(color: Colors.black),
        child: Padding(
            padding: const EdgeInsets.only(top: 18, bottom: 16, left: 30),
            child: Row(
              children: [
                Column(
                  crossAxisAlignment: CrossAxisAlignment.start,
                  children: [
                    Text(
                      result.format,
                      style: const TextStyle(color: Colors.white),
                    ),
                    SizedBox(
                      width: MediaQuery.of(context).size.width - 105,
                      child: Text(
                        result.text,
                        style: TextStyle(
                            color: colorSubtitle,
                            fontSize: 14,
                            overflow: TextOverflow.ellipsis),
                      ),
                    ),
                  ],
                ),
                Expanded(child: Container()),
                Padding(
                  padding: const EdgeInsets.only(right: 0),
                  child: IconButton(
                    icon: const Icon(Icons.more_vert),
                    color: Colors.white,
                    onPressed: () async {
                      final RenderBox button =
                          context.findRenderObject() as RenderBox;

                      final RelativeRect position = RelativeRect.fromLTRB(
                        100,
                        button.localToGlobal(Offset.zero).dy,
                        40,
                        0,
                      );

                      final selected = await showMenu(
                        context: context,
                        position: position,
                        color: colorBackground,
                        items: [
                          const PopupMenuItem<int>(
                              value: 0,
                              child: Text(
                                'Delete',
                                style: TextStyle(color: Colors.white),
                              )),
                          const PopupMenuItem<int>(
                              value: 1,
                              child: Text(
                                'Copy',
                                style: TextStyle(color: Colors.white),
                              )),
                        ],
                      );

                      if (selected != null) {
                        if (selected == 0) {
                          // delete
                          cbDeleted();
                        } else if (selected == 1) {
                          // copy
                          Clipboard.setData(ClipboardData(
                              text:
                                  'Format: ${result.format}, Text: ${result.text}'));
                        }
                      }
                    },
                  ),
                ),
              ],
            )));
  }
}
The delete button is located at the top right corner of the page. It is implemented with the IconButton widget inside the AppBar widget:
actions: [
  Padding(
      padding: const EdgeInsets.only(right: 30),
      child: IconButton(
        onPressed: () async {
          final SharedPreferences prefs =
              await SharedPreferences.getInstance();
          await prefs.remove('barcode_data');
          setState(() {
            _barcodeHistory.clear();
          });
        },
        icon: Image.asset(
          "images/icon-delete.png",
          width: 26,
          height: 26,
          fit: BoxFit.cover,
        ),
      ))
],
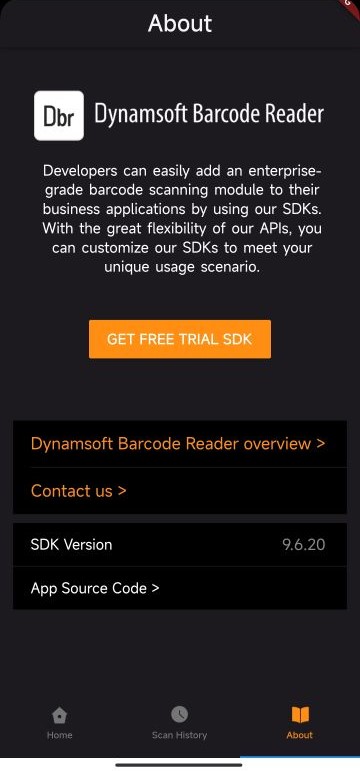
About Page
The about page displays the SDK version and some clickable links.
-
Title:
final title = Container( padding: const EdgeInsets.only(top: 50, left: 39, bottom: 5, right: 39), child: Row( children: [ Image.asset( "images/logo-dbr.png", width: MediaQuery.of(context).size.width - 80, ), ], ), ); -
Description:
final description = Container( padding: const EdgeInsets.only(left: 44, right: 39, top: 18), child: const Center( child: Text( 'Developers can easily add an enterprise-grade barcode scanning module to their business applications by using our SDKs. With the great flexibility of our APIs, you can customize our SDKs to meet your unique usage scenario.', style: TextStyle(color: Colors.white, wordSpacing: 2), textAlign: TextAlign.center, ), )); -
Button:
final button = Container( padding: const EdgeInsets.only(top: 48, left: 91, right: 91, bottom: 69), child: MaterialButton( minWidth: 208, height: 44, color: colorOrange, onPressed: () { launchUrlString( 'https://www.dynamsoft.com/barcode-reader/downloads/'); }, child: const Text( 'GET FREE TRIAL SDK', style: TextStyle(color: Colors.white), ), ), ); -
Links:
final links = Padding( padding: const EdgeInsets.only( left: 15, right: 15, ), child: Container( width: MediaQuery.of(context).size.width - 30, padding: const EdgeInsets.only(left: 20), decoration: const BoxDecoration(color: Colors.black), child: Column( crossAxisAlignment: CrossAxisAlignment.start, children: [ Padding( padding: const EdgeInsets.only(top: 13, bottom: 15), child: InkWell( onTap: () { launchUrlString( 'https://www.dynamsoft.com/barcode-reader/overview/'); }, child: Text( 'Dynamsoft Barcode Reader overview >', style: TextStyle(color: colorOrange, fontSize: 16), )), ), Container( height: 1, color: colorMainTheme, ), Padding( padding: const EdgeInsets.only( top: 13, bottom: 15, ), child: InkWell( onTap: () { launchUrlString('https://www.dynamsoft.com/company/about/'); }, child: Text( 'Contact us >', style: TextStyle(color: colorOrange, fontSize: 16), )), ), ], ), ), ); -
Version:
final version = Padding( padding: const EdgeInsets.only(left: 15, right: 15, top: 10), child: Container( width: MediaQuery.of(context).size.width - 30, height: 49, padding: const EdgeInsets.only(left: 20, right: 24), decoration: const BoxDecoration(color: Colors.black), child: Row( children: [ const Text( 'SDK Version', style: TextStyle(color: Colors.white, fontSize: 14), ), Expanded(child: Container()), Text( '9.6.20', style: TextStyle(color: colorText, fontSize: 15), ) ], ), )); -
Source Code:
final sourceCode = Padding(
      padding: const EdgeInsets.only(left: 15, right: 15, top: 1),
      child: Container(
        width: MediaQuery.of(context).size.width - 30,
        height: 49,
        padding: const EdgeInsets.only(left: 20, right: 24),
        decoration: const BoxDecoration(color: Colors.black),
        child: Row(
          children: [
            InkWell(
                onTap: () {
                  launchUrlString(
                      'https://github.com/yushulx/flutter-barcode-scanner');
                },
                child: const Text(
                  'App Source Code >',
                  style: TextStyle(color: Colors.white, fontSize: 14),
                )),
            Expanded(child: Container()),
          ],
        ),
      ));